Thursday 31 October 2013

Squash Frittata, Beet Cake

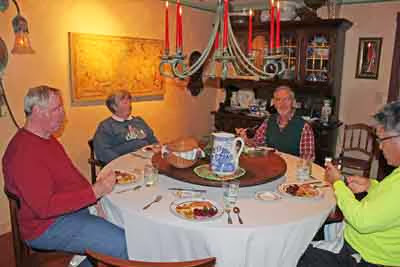
Dennis, Betty, Josh and Art (checking  his email).
A newspaper editor came to the garden this summer for an interview. He asked me why I garden. "You've been doing this every year for most of your life, so don't you get tired of doing the same thing over and over?" I tried to explain no two seasons are ever the same, every year is a new challenge and every year I try new varieties, different vegetables and herbs. Not being a gardener, I don't think he ever quite understood. But the primary reason I garden is what you see above, getting to share what I grow and produce with good friends over pleasant meals. These folks are all friends from Hawaii, we always look forward to their visits and they love good food, so cooking from the garden is always a pleasure.
Fresh from the garden, directly to the kitchen.
Betty especially likes beets, fixed any way they can be fixed, so we had steamed beet greens with balsamic vinegar, buttered beets with orange juice and a beet cake (along with grilled salmon, and a squash fritta).

Frittata, grilled salmon, beet greens and beets.

Here's the frittata recipe.

Squash Frittata
  • 3 tablespoons olive oil
  • 1/2 teaspoon grated fresh ginger
  • 1 small yellow onion, thinly sliced
  • 2 cloves garlic, chopped
  • 1/2 teaspoon ground turmeric
  • 2-3 medium zucchini (or young patty pan squash), in 1/4 inch slices
  • 2 tablespoons flour
  • 1/4 teaspoon baking soda
  • 4 eggs, beaten

Preheat oven to 375 degrees F.
Heat oil in a saucepan. Add onion and garlic and saute until soft. Add turmeric and zucchini, add a dash of salt and pepper and cook until tender, about 10 minutes. Stir in flour and baking soda and cool briefly.
Mix in the beaten eggs with the zucchini and pour into a greased 9" x 13" casserole pan and bake until set, about 25 minutes. Let cool for 5 minutes before cutting into serving sizes.
Apple pie - how did the crust get that way??

Beet cake. A leaf and powdered sugar created the design on the cake.
 For dessert we had either beet cake or apple pie so of course everyone had a small piece of each one. Here's the beet cake recipe, not mine, I was given the recipe by herb friends at Round Top, TX and I've made some adjustments to it over the years.

Beet Cake

  • 1 15 oz. can of beets (not pickled, just plain, canned beets)
  • 1 1/2 cups flour (I use 1 cup unbleached flour and 1/2 cup whole wheat flour)
  • 2/3 cup vegetable oil
  • 3 eggs, beaten
  • 2 cups sugar (I use 1 1/2 cups granulated stevia or Truvia and 1/2 cup sugar)
  • 2 teaspoons cinnamon
  • 2 teaspoons dry ginger
  • 2 tablespoons freshly grated fresh ginger
  • 2 teaspoons baking soda
  • 1/2 teaspoon salt
  • 1 cup nuts, chopped (I used pecans or walnuts)
  • 3/4 cup coconut

Heat oven to 350 degrees F.
In a food processor, empty the entire can of beets, juice and all. Blend it well. Combine the rest of the ingredients except for the chopped nuts, mixing well. Fold in the chopped nuts and coconut. Pour into a 9 x 13, oiled and floured baking pan (or 2 round cake pans). Bake until a knife inserted comes out clean, about 25-30 minutes. Let cool. Serve with real whipped cream. Or, if using 2 round cake pans, use this filling between the layers:


Cream Cheese Filling
  • 1 (3 ounce) package cream cheese, softened
  • 1/3 cup butter, softened
  • 4 cups powdered sugar
  • 1 teaspoon vanilla extract
  • 2 tablespoons milk

In a medium bowl, blend the cream cheese, butter. Gradually mix in the powdered sugar, vanilla and milk, mixing well. Spread on bottom layer of cake, then add the top layer. Let set up for an hour or so before serving. The cake can be made ahead and frozen, then thawed before serving.

Beet cake doesn't need frosting, just some real whipped cream on top.


Friday 25 October 2013

Composting Simplified

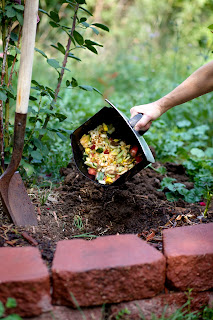
It's always a bit confusing to me when people tell me they don't compost because it's too complicated. My mother used to compost regularly, back in the 1950s and '60s. All she dig was dig a hole in the ground next to the raspberry patch. It wasn't a big hole, just 18 inches across and about that deep. Every day when she had coffee grounds, vegetable scraps, potato peelings and egg shells, they'd go into the compost. About once a week she'd add a bit of soil and mix it in. When the compost pit got full, she'd dig another one and let the first one rot. She might turn the rotting compost a bit and by the next season she had rich, black compost that she used in her potted plants and garden. If she had this great kitchen appliance, her composting would have been even easier, because the smaller the pieces you put into the compost pile, the quicker it decomposes.

The Green Cycler is a handy addition to your composting. No cords to worry with, it's easy to turn the hand crank and chop the kitchen scraps so they'll compost faster. Green Cycler is available here and cost around $95 and will last for years.
The Green Cycler, a hand-cranked, kitchen scrap chopper.
Of course you don't put meat or food scraps in the compost, otherwise you'll attract the neighbor's dogs, cats, wildlife, all wanting to dig into the compost for tasty scraps. But egg shells, chopped vegetable scraps, watermelon rinds and carrot peelings, all go into your compost.
The drawer holds the chopped vegetables until you're ready to add to the compost.
It's a nifty idea, you put in the scraps, turn the handle and everything goes into the holding drawer. No smell, no mess, and when it's full, you simply pull out the drawer by the handle and carry it to the compost pile.
You can even compost directly into your flower bed if you don't have a compost spot. You might even add the scraps to a spot in the flower or vegetable garden, and every month, move a few few away and start a new one. In no time you'll have rich, soil with lots of nutrients for next year's growing season.


My compost bins.
Above are one of my composting areas at Long Creek Herb Farm. Weeds pulled from the raised beds, vegetable scraps, coffee grounds and things like squash, damaged tomatoes, etc., all go into the compost. It gets turned 2 or 3 times a year, one side is always the older, almost-ready compost and the other side is the newest. The next photo, below, is the compost bins at my favorite restaurant, The HerbFarm in Woodinville, WA. They grow their own organic produce in their own gardens and all of the vegetable excess from the kitchen goes into the compost.
One of several compost bins at The HerbFarm Restaurant.
My old friend, Felder Rushing, says there's no mystery to composting. "You just pile stuff up and let it rot." You can make it complicated or simple but it's a great way to recycle food scraps that would otherwise go into landfills. Happy composting!

Thursday 17 October 2013

Lavender Wands

Lavender in bloom.
Lavender wands are an odd craft. They're not really very functional other than scenting a drawer, or adding fragrance to clothing. Yet as an object of art, they are highly desirable. Each one is different, each one is an expression of creativity and dedication by the one who creates them. I once spent an entire summer, 1984, making lavender wands while recuperating from a bad back injury. I had a bountiful lavender crop that year and since lavender helps lift the spirits, it was a useful activity from which I learned a great deal.

While I was at the International Herb Association conference in Townsend, TN this summer, I photographed my long time friend, Pat Kenny, as she made lavender wands. She's an amazing artist, so creative that everything she touches seems to become a piece of art. So here's the process for making a lavender wand.

Begin by tying together about 17 or 19 lavender spikes.
You always begin with an odd number of lavender stems, otherwise the weaving won't come out right. I use 17 but some will use 19 or 21 stems. Tie the stems together at the base of the flowers with a ribbon. Don't cut off the ribbon, that's what you will be using to weave the wand.
Then bend over the stems and you're ready to weave.
Showing bending the stems as you begin to weave in and out.
Pat changes ribbon as she goes, creating ever more interesting patterns and designs. She simply tucks in a new piece of ribbon and makes sure the end is secure, then continues weaving under and over the stems.
Here's Pat Kenny with one of her wonderful lavender wands.
Look at these (you can even click on the photo to make it larger). Very different ribbons, varying designs, all works of art. Pat's lavender wands are amazing. I have one she made and treasure it because it's beautiful, deliciously scented, but more because it's from my friend.
The ones I've made tend to be simpler, like the one above. Sometimes I've added lemon balm inside for added bulk and fragrance. Below is one I made for Hillary Clinton in 1985 when she dedicated the Heritage Herb Garden in Mountain View, Arkansas. I made it from the first lavender grown in the garden there. Funny now, we were so young!
Hillary Clinton, holding one of the first lavender wands I made.
Lavender is one of the most soothing, relaxing herbs you can grow. It's used in cooking, bath blends, potpourri, medicine, sleep pillows and many other ways, but a great way to preserve its soothing fragrance is in a lavender wand. Thank you, Pat, for sharing your methods for making your artful wands!

Wednesday 9 October 2013

Our Summer Interns

Overhead view of part of our garden.
A passion for plants can have unintended consequences. For example, I've been fortunate to live on the this wonderful farm for 34 years. During that time I have improved, expanded and embellished the garden. I've built raised beds, put in gravel pathways, added a gazebo and arbors, and added tons of compost. All of that in order to keep planting new, rare, unusual and fun plants.

For example, I was among the first to grow and blog about ghost peppers, 6 years ago. I was growing green pepper basil and achocha before anyone for many states around even knew what those plants were. I've grown the remarkable Dancing Tea Plant, curry tree, green pea eggplant and Dragon's Claw millet, all out of a passion for seeing and tasting new plants. Over time my love for new plants has grown beyond the bounds of what  I can manage. There aren't enough hours in the day to grow, till, weed, photograph and write about all of my plant experiments. So more than a decade ago, we have been hosting interns to help out with the garden.

Over the years we've had a wonderful variety of interns come to our garden. We worked first with a non-governmental organization which provided interns for 9 month stretches. Eventually we changed to working through the WWOOF organization (Willing Workers on Organic Farms). It's a world-wide organization and gives wonderful opportunities for those wanting to learn about a variety of farming or gardening techniques. This garden year we've hosted 2 WWOOFers, each for 6 week periods.
Anthony

Anthony came to us from Pennsylvania in early April after working on a farm in Virginia. He arrived just in time to help with the garden clean-up, tilling and bed preparation. He had not planted a garden before so learning about seed depth and spacing were his first lessons.

He's also an adventurous cook and lover of hot sauces, so while he was here, he worked with me in the kitchen, learning to make homemade crackers and hot sauces. Because of his background of working in a pizza place, he had a feel for working with flour and within a few days, had perfected crackers, making more beautiful and crispy crackers than I had in the past. (Recipes from my book, Easy Homemade Crackers Using Herbs).

A few of Anthony's crispy crackers.
Anthony left us in mid-June right after our annual garden open house and headed for Las Vegas, NM, where he worked on a farm until the fall. He stopped to visit us for a day and night on his way back to Pennsylvania where he will work the winter then return to WWOOFing on farms next summer.

Our next intern who also  quickly became a good friend, is Charles. We were his first WWOOFing farm and he was eager to learn every aspect of farm life. He took over the daily chores with the goats and chickens and learned the process of making goat cheese and yogurt.
Charles

Charles also had a love for hot sauce and since we're growing 40 varieties of hot peppers this year, I quickly put him to work learning how to make and can hot sauce (recipes from my newest book, Make Your Own Hot Sauce). We also canned tomatoes, something he'd not done before. Josh taught him about sourdough bread making and Charles quickly learned that, as well.

Charles is a vegetarian, not because he dislikes meat, but because he really likes vegetables, so I took on the challenge of learning to be a better vegetarian cook. Our interns fix some of their own meals in the guesthouse kitchen, but lots of our meals are combined, especially at dinner time. I really enjoyed learning new recipes and finding ways to have balanced-protein meals without meat. I was surprised that I didn't crave meat and went much of the 6 weeks Charles was here, eating no meat.

Charles playing guitar and singing.
Charles has an excellent singing voice and entertained us several evenings with singing and playing the guitar. He and Anthony had both been in bands and they got to meet when Anthony made his stop-over on his way home.
Josh, Charles and Anthony, discussing the affairs of the world.
So, even though our garden has grown far beyond what I can take care of myself, it has opened up opportunities for interns to come and learn from me. I feel very fortunate to have these amazing young people (not all young, either, WWOOFers can be of any age) come to stay with us, learn about cooking with herbs, planting vegetables, tending animals and cooking good food.

Almost without exception, the interns we've had over the past 10 or 12 years, have been passionate about food, eager to grow their own, thirsty for knowledge and willing to share what they know, as well. I admire them for their willingness to take risks, do new and interesting things and discover what they want to do in life. I feel as if I learn more than they do, each one bringing something new and interesting with them. Here are a few more of our interns from previous years.
Kristin
Paul the pie man
Adam, who has been back 3 times working.
Yakof Smirnoff, with intern, Gabe
Seth, who came by bicycle, and mastered cracker making, too.

Each person who came as strangers, left as friends. Each has contributed their talents and ideas and made our lives better by their sharing journey of discovery with us. I feel so very fortunate to have the opportunity to know and learn from each person who comes to our garden.
Sunday 29 September 2013

Trinidad Moruga Scorpion Pepper

For many years I've been growing what was the World's Hottest Pepper, the Bhut Jolokia, or Ghost Pepper. In my book, Make Your Own Hot Sauce, I give some background of the pepper and offer a few recipes in using it in hot sauce. This year for the first time, I'm growing the current record holder for the world's hottest pepper, the Trinidad Moruga Scorpion. Later today I'll be making a batch of hot sauce with both of these peppers.
The two world's hottest peppers.
Depending on the source (I accept the New Mexico State University Chili Pepper Institute's measurements) the heat, measured in Schoville Heat Units, or SHU, can vary slightly. They rate the Ghost pepper at 330,000 to 1,023,310 SHUs. The new record holder, the Scorpion, weighs in at 1,500,000 to 2,000,000 SHUs.
In other words, it's pretty darned hot! So you may wonder, why would anyone want peppers that hot? Well, for the guys (and it IS a guy thing) who crossed the ghost pepper with a Red Savina habanero pepper and came up with the Scorpion, it means bragging rights. It also means they can license seed companies to sell their seed, and make a profit. But beyond that, believe it or not, these intensely hot peppers, have flavor, as well. Flavors not necessarily found in other peppers. And you don't eat them raw, or you shouldn't because it can be dangerous. But if you mix them with other kinds of peppers and ingredients, you get the flavor and not as much of the heat. To give an idea of where this heat comes on the giant pepper heat scale, keep in mind the Scorpion comes in at between one million and half and two million heat units. For comparison, look at the Jalapeño and Cayenne listing, below.
A Jalapeño pepper is rated at 3,500 to 8,000 SHUs. And my favorite for roasting and eating, the Poblano, is almost without heat, with 1,000 to 2,500 SHUs.
But if I combine some roasted Poblanos, a few Jalapeños, onions, garlic, vinegar, cilantro and a couple of Ghost peppers and a Scorpion, it will be a tasty hot sauce for just about anything I put it on. I'm getting ready to do a program on making hot sauce for the Ozarks Area Community Congress coming up next weekend and we'll have some tasting of my different sauces. This one I'll probably name, Two Ghosts and a Scorpion.
Various hot sauces I've made so far.

Monday 23 September 2013

Pepper Roasting

A few peppers in the roaster.
We celebrated the Fall Equinox by traveling up to visit our friends at Bear Creek Farm near Osceola, Missouri, and roasting baskets of peppers. Robbins gathered about a half bushel of their sweet New Mexico peppers. I also took a few Hatch peppers, those sweet ones that Hatch, New Mexico is famous for, along with some of my Sugar Chilies from home.
Everyone took a turn with the roaster.
It takes only about 10 minutes to roast 5 lbs of peppers. With the flame turned up high, the pepper skins immediately start popping and sizzling. As the peppers turn over the fire, most of the charred skin falls through the bottom of the cylinder onto the ground. It's easy work and fun, too.
Scraping away the remaining skins.
While it's not necessary to remove all the charred pepper skins, we decided to give it a try. The charred skin flavor is actually good and adds a smoky flavor to dishes. But it was fun seeing how clean we could get the peppers. At the same time we removed the stem top, which also pulled out some of the seeds. The seeds can just as easily be left in.
Roasted, skinned peppers, draining.
Shown above is about half of the peppers we roasted. The roaster makes quick work of the peppers and even cleaning off the remaining skins is pretty fast. What we learned after we'd done the scraping, was, putting them in a pan of water makes it easy to simply wash away the skins and is less work than scraping. But it was all quite pleasant and at the end of about an hour, we had enough roasted peppers to fill several gallon zip-plastic bags. Today they'll be laid out on cookie sheets over waxed paper and frozen. Once frozen, they'll be stacked in zip bags where they will keep in the freezer for many months. Of course they're so tasty they'll never last that long!
Sugar Chilies, ready for roasting.
And what does one do with roasted peppers, you may ask? Here are a few ways we use them. Instead of freezing the peppers, cut  up the roasted peppers, put them in a jars and cover with olive oil; they will keep in the refrigerator for about 2 weeks. Use them like you would any canned pimentos. Roll strips of roasted peppers around small pieces of cream cheese, then roll the whole thing in thinly-sliced ham, slice in bite sizes and run a toothpick through each slice and serve as appetizers.

Add chopped, roasted peppers in scrambled eggs. I like to lay slices of roasted pepper on a sandwich, with some avocado, tomato, some cheese and toast it. Or, my favorite way is to use one or two roasted peppers in my morning burrito (which includes a bit of sausage, some onion, fresh sweet or hot pepper, even a bit of summer squash, all cooked with some taco seasoning and rolled in a tortilla. That's my favorite breakfast!
My favorite breakfast burrito.
You've read me say before I make lots of hot sauce from the 40+ varieties of peppers I grow. Roasted peppers, whether fresh or frozen, are a perfect ingredient for making hot sauce. If you want to make your own hot sauce, you can order my book, Make Your Own Hot Sauce, from my website.

After the pepper roasting, we ate bowls of chili for supper. We all put some of our chopped up, freshly roasted peppers in our chili. It was just about a perfect first day of the fall season!

Monday 9 September 2013

Robin Mather, The Feast Nearby

Senior Associate Editor of Mother Earth News cavorts in the garden at daybreak at Long Creek Herb Farm. How's that for a headline?

Robin Mather
The great thing is, we're so far off the beaten path, or even a good road, that people who visit us have to really want to be here. That's fun for us, of course! Robin Mather came from Mother Earth News in Topeka, Kansas to meet up with Felder Rushing, from Jackson, MS, who I posted about last week, for a stop-over at our place before they headed over to Baker Creek's monthly farmers market day.

Robin is not only an editor, but also a former food editor for the Chicago Tribune. That probably meant I should have been intimidated at planning meals for her, but once I learned she has raised goats for years, keeps chickens in her back yard, lives simply from the garden and is a true "foodie" I didn't worry. "Foodies" as you know, are those of us who enjoy the actual taste of good food, whether it's a freshly-picked, ripe tomato, or a lavish meal with a glass of wine. It's the taste we go for, not a meal for the sake of eating. So of course I had fun cooking from the garden. Here's the menu for the evening they arrived:
White Grape and Mint Salsa with chips
That day's freshly canned salsa from the garden
Gazpacho Salad with Cucumber and homemade crackers
Chicken breasts stuffed with Lamb's Quarters and Sweet Potato leaves, served with "Green Sauce" made of French sorrel, herbs, lemon juice and olive oil
French greenbeans flash-fried with garlic and lemon zest
Zucchini Crab Cakes
Corn Pudding
Josh's freshly-baked sourdough bread
Blackberry-Basil Sorbet
Part of the meal, showing chicken, corn pudding, zucchini crab cake and beans.
Robin and I hadn't met before so it was fun getting to know a bit about her. I knew she worked at Mother Earth News and lucky for us, she brought along her wonderful book, The Feast Nearby, a collection of essays and recipes from a year of eating locally on a budget of $40 a week. (The full title is: The Feast Nearby: How I lost my job, buried a marriage, and found my way by keeping chickens, foraging, preserving, bartering and eating locally (all on $40 a week). You can order the book on Amazon by clicking here. The book is wonderful. Forced to hibernate in a tiny cabin and try to regroup after such major changes, The Feast Nearby shows what kind of person Robin really is, kind, loving, tenacious, unwilling to let life's slings and arrows bring her down.
It was so much fun having Robin Mather and Felder Rushing in the garden and I hope they will come back again soon. Felder brought fig preserves from his grandmother's fig bush in Mississippi. Robin brought us a beautiful bottle of green walnut cordial - yes, made of walnuts back in June when they were still green! And it is outstanding. Josh and I both feel so fortunate to know such kind and generous people. I absolutely love fig preserves - a rare treat for us, and now I am devoted to green walnut cordial, too!

Thanks for stopping by to read what's been happening in our garden this week! Happy gardening.